Wednesday, April 30, 2008

Tikit 2 Pannier Front Rack First Impressions


Installation of the prototype front rack was easy. It attaches to the brake posts and to a braze-on on the bottom of each fork leg. The whole process took less than 3 mins. The rack itself is nicely welded and blends into the rest of the bike when not being used.

My first test of the 2 pannier Tikit front rack was a mission of necessity. I was all out of food and needed to resupply. I put some Ortlieb front panniers on my trusty stead and headed to the grocery store. Throwing caution to the wind I decided to restock my supply of canned goods. I'm not sure how much weight I had in each pannier, but it was in the 12-15lbs range. Riding home the Tikit's handling was predictably slower than normal. For a touring bike that's a good thing and it changed the feel of the Tikit considerably. A couple time I was going into a corner and had to readjust my line at the last minute when the Tikit didn't dive into the turn as quickly as usual. It didn't take long to get used to the new more sedate Tikit and I think I'll really appreciate the slower more stable handling on tour. I'll be interested to see how the bike handles with some weight in back to balance things out. The rack proved stiff enough that I could wiggle the bars without inducing any pannier sway.

The ability to carry two panniers up front when needed and still fold the Tikit [note - you can leave the right side pannier on when folding the bike] without having to remove the rack is really useful. I'm glad I went through the trouble of getting this rack made and really appreciate Bike Friday taking the project on. I'll keep putting the rack through its paces and report back during the summer.

I should note that Bike Friday built this rack for me as a custom order and it isn't a production item at this point. Bike Friday wants to make sure they've got the design dialed before deciding to add it to their line up of Tikit accessories. All my comments refer to the rack mounted on a large size frame. The smaller frames have less clearance between the front and rear wheels when folded so there may be some issues that I am unaware of.

Showercap & Racks


Here are a couple photos of the Tikit with standard rear rack and 2 pannier front rack installed then covered with the shower cap. The shower cap still fits over the bike, but the rear rack is somewhat exposed since the back corners are rounded on the rack the shower cap won't stay in place over it.


The cap comes down almost to the ground over the front wheel, but due to the different shape of the 2 pannier front rack it is touching the front tire. If you rolled it like this you would wear through the shower cap in no time. I'll mention this to BF and suggest how the production 2 pannier front rack could be designed slightly differently to allow for an unhindered roll.

Once covered you can still lift the whole bike with the carry handle and move it around.

Broken Handlebar Latch


I fold my Tikit a lot and although I try and take care of my bikes they are tools to get me around so I don't baby them. I've had very few problems with my Tikit so far and I suppose I was due for something to wear out or break. The other day as I was folding the Tikit I realized the bars were not staying in position. Upon further inspection I noticed the plastic latch had snapped where it mounts to the frame and was only hanging from one bolt.


I could still fold the Tikit, but rolling it was a bit of a drag - literally! As my right Ergon grip would rub on the sidewall of the tire. I sent Bike Friday an email right away asking for a replacement to install on my Tikit and a spare I could keep as a back up. I was happy to hear back from them that they had come up with a metal replacement part that would be much more durable - excellent! The new latch arrived a few days later with the prototype front 2 pannier rack.


Being the fashion victim that I am I painted the metal latch to match my Tikit's black frame. Installation was a snap as it uses the same hardware as the plastic latch. I did use two washers on each bolt between the latch and the frame to get more clearance for the post to slide into. Without them I had trouble getting the post inserted into the latch. Perhaps I could have just bent the metal latch a bit to achieve the same result, but I had some washers close at hand so I used them.

It's great to have my Tikit back at 100% and the new metal latch won't break under hard use. I'm glad Bike Friday had already solved this problem and had a new improved latch ready for me.

2 Pannier Front Rack Installed Photos


Tuesday, April 29, 2008

Tikit 2 Pannier Front Rack Photos


The long awaited 2 pannier front rack prototype has arrived from Bike Friday. It looks very nice. I'll be installing it tomorrow AM and testing it out on a grocery run, but I know some folks have been eager for updates on this rack so I thought I'd post some photos right away.

Monday, April 28, 2008

Bare Skin

You just can't afford to waste a sunny warm day in Canada. Even a short ride to grab lunch or a run to the post office is money in the bank after a loooooooooooong cold winter.

Sunday, April 27, 2008

Greenspeed Scorcher TR


Even in the far north spring eventually arrives...=-) I've been waiting to swap out my stock Schwalbe Marathons for some Greenspeed Scorchers. Since the snow looks to finally be gone I took the opportunity to make the change. The Marathons were trouble free and flat free tires for me so I can't really complain. At the same time I am excited to see if the Scorchers improve my speed and/or comfort on the Tikit. I bought the TR version of the Scorchers from Dana at Bent Up Cycles. They are supposed to be less flat prone and a more rugged tire than the regular Scorchers.


It is mostly in my head, but the slick 40mm Scorchers give my Tikit a bit of a hot rod look...=-)


The Scorchers went on easily by hand - always a good thing! They fit fine under the Tikit's fenders without adjustment. As you can see from the photo above there isn't much clearance between the front tire and the tab on the front rack. I'll be removing this rack as soon as the 2 pannier rack arrives next week. If I was going to keep it I'd file down the tab a little bit to create more clearance.

Road test to follow.

Peter's Tikit Latch Upgrade


Peter posted a report about his experience doing the latch upgrade to his Tikit on the Tikit Talk Group. I thought I'd re-post it here in case anyone else is considering undertaking the job:

[Thanks for the detailed report Peter...=-)]
__________________________________________________________

"I've pretty much completed the upgrade. Here are the tools I needed:

1) A drill. My old corded has managed to escape the closet it was in, and since I couldn't find it in a tidy manhattan 1-BR, and worse, neither could my wife, a new cordless was ordered as part of our prep to move in August. And for this.

2) A metric set of drill bits.

3) A set of metric hex wrenches

4) A ratchet set, metric

5) A flat-head or phillips-head screwdriver (to take off the reflector)

6) A metric tap set

7) Some grease

8) Thread-lock (loc-tight(tm) or some such. The blue stuff)

9) Patience

10) Recommended: A couple of small black wire-tie in case you need to re-tie the cable ties on the frame that support the o-ring through which the brake, derailer, and fold cables run. Also, some patience. And An extra pair of helping hands if you don't have a bike stand, as I don't. Last, if you do this, order a replacement bike friday stem decal because the double-sided tape that holds that on the bike doesn't come off easily.

The instructions that come with the upgrade kit that BF sent me were excellent, however the first 3 page are not complete, the addendum notes the proper cable routing including the o-ring and the wire ties, and it notes the need to drill into and thread a hole in the new stem. Also, note that the tap needed is an m6x1, which means a 6mm diameter tap with a 1mm spacing between threads. The common sizes in sets appear to be m6x1.0 and m6x0.75, so I was really worried. I hope that BF will update their documentation to note this.

Right now my bike is all in one piece, folded up again. The new stem is more solid. There is some flex, more than I remember... but before that was because the hinge wasn't solid enough, and the give there was noticeable enough that the flex in the stem just didn't mean anything.

The drilling of the front was a bit scary, but since I had the old stem to practice on I built up some confidence and after creating two well-threaded test holes I felt pretty confident.

Of course, before doing this I spent a total of about an hour on the phone with two techs at BF to confirm what I needed to do. Hugh, Tim, and one other rep whose name I have written down at work, but not here, were patient in answering my question and accepting my feedback (eg why didn't they pre-drill the hole and leave the tapping to the user, since that would eliminate problems like positioning the hinge at an angle that essentially screws up the fold, something that the instructions didn't explain clearly enough). The tapping was quite easy.

I noted in my first post that the stem didn't feel as stable as I thought it should. One of the reps very patiently explained how to re-fit the stem into the front forks and how to manipulate the spreader and the bearings assemblies to work it better, and sure enough when I followed his advice later Tuesday night, it all came together.

One note is that the bolts that secure the cable inside the stem is not made to be removed. Unfortunately, it took me a few tries to get my cable routed correctly, to get the distance correct, etc. so I stripped a bolt. Working in Manhattan, there aren't a lot of good mechanic-oriented shops near my office, so BF sent me out a replacement for this along with the replacement front decal, and all I paid for was the overnight shipping.

Overall, I think that David, the BF salesman, was correct in saying that this requires someone with a mechanical aptitude. Certainly if you've done it once, it would be much easier to do it a second time. However, the instructions could use clarifications in some parts, and the addendum they sent me needs to be part of the instructions, because they don't make nearly as much sense out of context, and not at the end (maybe they were meant to be the first thing).

-Peter

P.S. BF by default seems to ship with an "OK to leave without signature" for their smaller parts. You may want to tell them to not do this if you live in a place where this is not safe."

Saturday, April 26, 2008

Advanced Tikit Rolling

Low Roll

I've rolled my Tikit quite a lot and come up with a couple techniques that may be of interest to the new Tikit owner. The standard way to roll a Tikit is what I'm calling the Low Roll. You hold the rolling handle naturally and the Tikit is out in front of you. You are supporting about half the weight of the bike this way. This method is excellent for moving quickly [running to catch a bus] or when you have lots of obstacles to get around [busy shop]. You have good control of the folded bike and can easily move rapidly with it. The one downside to rolling your Tikit like this is you may become tired after and extended period as you are holding up a fair bit of weight.


High Roll

That's why I started using a second rolling technique I call the High Roll. By raising the carrying handle until your handle is above the Tikit you balance most of the weight on the front wheel so you can relax your hand. This works well for moving slowly [browsing in a shop] or when you stop to chat with someone. The downside is you can't push the bike very quickly in this mode and you don't have as much control for moving around challenging obstacles.

Both methods are useful and I find myself switching back and forth without thinking about it.

Saturday Downtown

...fueled by 2 shots of espresso I was rambling around downtown...in search of adventure and trying my best to avoid doing my taxes...=-) Did you know my Tikit is a business expense? Part of my green business plan...cunning I know...=-)

Sarah tries the Tikit...

Love the Fold? - Who doesn't?

If you enjoy well written travel stories with pictures of far flung bicycle adventures you should tune into the Love the Fold Blog. I've been to India a few times, but haven't made it to SE Asia yet. So I find photos of bike travels in the area captivating.

When you read the latest posts you'll see some full size bikes [great taste BTW - I've got a Surly LHT as well!], but if you dig a bit deeper you find lots of folding bike content including some great Tikit adventures.

Wednesday, April 23, 2008

Tikit 2 Pannier Front Rack Update

Update: the prototype 2 pannier front rack is in the mail and I should have it early next week. I'll post pictures and my initial impressions as soon as possible.

Speaking of racks. Bike Friday is working on a 2 pannier front rack for me which should be ready in the not too distant future. I'm optimistic it will be another great improvement to what I can do on my Tikit - with a few caveats:

  • I'm pretty sure that the rack should not have any impact on folding the large size Tikit I have. It isn't clear yet what will happen with the smaller frames.
  • Bike Friday isn't making any promises about this product until they see how the prototype works. As I said I'm optimistic, but you never know until you have a rack on your bike how it will perform. So price and availability are uncertain at this point.
  • I think a 2 sided rack for the Tikit would be very useful so I'll do my best to make it happen. If a rack like this is a critical factor in your decision to buy a Tikit I'd let Bike Friday know - sales@bikefriday.com They are very customer focused will respond to input they are getting.

Tuesday, April 22, 2008

Wet Tikit + Clean Apartment?

I rode over to Sarah's place to watch a movie, but I realized my wet & slushy Tikit was not going to do anything nice to her clean carpets and hardwood floor. Obviously I wasn't leaving it outside! Then it came to me where do you deal with dirty things? The bathtub...*snap*...of course. I left my trusty stead in the tub while we visited and then grabbed it on the way out. The puddle of dirty water that I left behind will be history the next time the tub is used.

Monday, April 21, 2008

More Cargo Hijinx

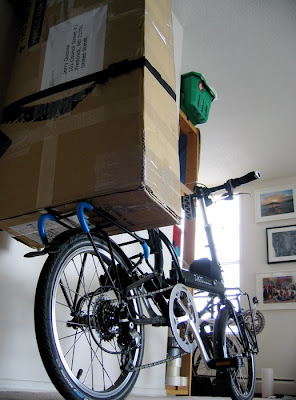
I'm pretty sure this not the use Bike Friday intended when they designed the new Tikit rack. I got quite a few strange looks at the post office when first I unfolded my Tikit and then I strapped the box I was picking up to the back of the bike...=-)

Friday, April 18, 2008

Standard Tikit Rack Review

If you are a regular blog reader you'll know that I've been riding my Tikit a great deal and really enjoying the versatility of this folding bike. One thing that has been missing though is a way to carry cargo on the bike as opposed to on me. The existing single pannier front rack does let you carry some stuff with you, but its capacity is limited. I have been looking forward to the release of a rear rack for the Tikit all winter. Needless to say I was excited to get a prototype rack to test.

Before I talk about this rack I want to clarify that Bike Friday is coming out with two rear racks for the Tikit. The rack shown on this site and which I'll review is a light duty rack meant for commuting and errand running. Bike Friday is calling this the Standard Tikit Rear Rack. The second rear rack to be released late this year will be more robust and will be able to carry full size panniers. I'm calling this second rack the Tikit Touring Rack just to keep them straight in my head.

When the box arrived with the standard rack in it I had a flashback to Christmas! The rack was very light in my hand and looked like quite a refined prototype. All the welds were neat and the powder coat looked nice. The rack had 4 blue PVC tube sections installed on it as protection when folding the Tikit. Since I have an all black Tikit I didn't love the blue and started scheming about how I'd cover the tubes up with black electrical tape. Looking at the photo sent out by Bike Friday of the production rack it seems they went with a more neutral clear protective tubing which should look great with any colour Tikit.

I've installed a lot of racks in my time and more than once a beautiful looking rack turned out to be a nightmare when it just didn't want to fit onto the bike in question. One clear advantage with buying accessories designed specifically for your bike is they will fit like a glove. The standard rack didn't disappoint. It went on in a few minutes without a hitch. The only issue was having to clean the paint out of the upper rack mounting braze-ons so I could get the bolts in. In the photo of the production standard rack the fender support strut has been removed and the fender attached to the rack. I chose to leave this strut in place and just put the rack over it as I preferred how the stock setup looked. This is a purely aesthetic issue with no functional difference.

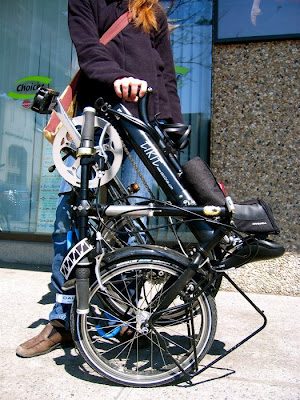
Once I had the standard rack mounted I tried folding my Tikit to see if there was any impact on the fold. Not only was the fold unchanged, but the folded Tikit now rested on the rack making it uber stable. You'd have to try hard to knock it over now - very nice. Not only did the rack add functionality to my Tikit it solved one of my few dissatisfactions with the bike. Another bonus is that the rack completely protects the rear fender from being scratched during the folding process. Bike Friday notes that you can pack the Tikit in a suitcase without removing this rack. I haven't tried this as I don't fly with my Tikit [yet!], but I'm glad they designed it with air travel in mind. The less disassembly/assembly you have to deal with when on the road the better!

I've used the standard rack for a couple weeks now carrying a variety of small loads. When not needed I don't notice the fact I have the rack mounted as it is low profile and very lightweight. I'm pleased that it doesn't interfere with the fold and the added stability of the folded bike is welcome. I've even carried a large box I need to ship on the standard rack by strapping it to the seat post. It was surprisingly stable and has really opened my eyes to the expanded capabilities of the Tikit now that the standard rack is mounted.

The standard rack will fit trunk bags, but full-size panniers will not work due to its small size. You'll have to wait for the touring rack to carry your Ortliebs! You could possibly mount some of those combo trunk bags with fold out panniers although I don't have such a beast to test. Bike Friday has indicated it will be developing luggage that will be designed to work with this rack. I'll look forward to see what they come up with. I've already been thinking about mounting a milk crate to this rack with zipties. I'd just do this when I needed to carry that extra large load and remove it afterwards.

I have experienced one problem with this rack. The protective tubing at the front of the rack can move out of place resulting in some scratching of the rack if you fold it and don't notice the problem. I'll fix this by covering the tubing with black electrical tape which will secure it in place and allow me to keep my Tikit Ultra-Stealthy-Black...=-) I've advised Bike Friday of this issue and I am confident they resolve it on the production racks.

As you can tell I am quite happy with this rack. It's a refined product that is attractive and functional. I would definitely add it to my list of must have Tikit accessories. The utility rack will cost ~$50.00 and can be purchased from Bike Friday here or ordered with any new Tikit.

Thursday, April 17, 2008

Hauling Cargo

I apologize for how long it is taking me to post a review of the Tikit rear rack. I've been super busy at work which is cutting into my blogging time!...=-( I'll definitely have something posted on the weekend. Until then here is the biggest load I've hauled so far.

Tuesday, April 15, 2008

Paris-Roubaix?

Perhaps not, but a race fan can dream!

Rock Solid

I'll post more about the new Tikit rear rack shortly, but one thing that I wanted to share is how stable the folded bike is now. You'd have to kick it to knock it over. Very nice...=-)

Sunday, April 13, 2008

Sunday Rider

I love cruising around downtown on Sunday mornings when the roads are deserted.

Calgary Folding Bike Club

The membership drive is going well...=-)

mmmm....coffee & croissants!

After a demanding 200K brevet on Saturday a coffee ride on my Tikit was just what the doctor ordered.

Care Package

I rec'd a package from Dana at Bent Up Cycles recently. Some Greenspeed Scorcher TRs 40-349 that I want to try on my Tikit over the summer and some small tubes for my Tikit and my Fujin SL recumbent.

I'm excited to see how the Tikit rolls on the new rubber...=-)

Thursday, April 10, 2008

Alternate Packing


Alex Wetmore posted this to the Yak List:

"Walter told me about this the other day on his #bikefriday IRC channel:

It lets the bike lie lower in the suitcase and makes it easier to fit everything. I also didn't need to remove the stem extender. The change is simple, rotate the crank 180 degrees from what the directions say (so the non-drive-side is facing you) and rotate the fork so that the brakes are facing the rear derailleur and wheel.

Fitting drop bars and the front wheel is a little different too. I found it easier to place the drop wheel in first, then lay the drop bars over the front wheel. The stem is in the center of the suitcase and the brake levers are facing the outside.

alex"

Wednesday, April 9, 2008

Thursday, April 3, 2008

Tikit Rear Rack


Bike Friday sent out an email recently showing the rear Tikit rack pictured above with the following description:

"A rear rack is now available for the tikitTM! If you order your tikitTM by April 18th you can get a rear rack for Free [$50 value].

TikitTM rear rack features:
  • Can haul things.
  • The Detours Teeco bag and several trunk bags fit on it. (We are developing more bags that will work in the future.)
  • Does not effect the bike fold.
  • Protects the rear fender.
  • The tikitTM can pack in a suitcase with the rack still on it!"
There is a second Tikit rear rack in the works that will be designed for touring and will most likely have to be removed to pack or fold the bike.